Rapid embedded development with React and Node
As previously mentioned, this semester I enrolled in a new subject, Prototyping Physical Interactions, which involves learning how to utilize embedded hardware such as arduinos, to create flexible and iterative information systems and solve real problems.
In groups of five, we worked on tackling a problem from a design-oriented perspective. This required developing an initial prototype, performing user studies and adapting the prototype to solve problems that were found in the user study.
The domain we set out to solve was finding the ideal place for one to study at within UTS’ Building 11, a huge building with a plethora of hidden and interesting rooms across its twelve floors.
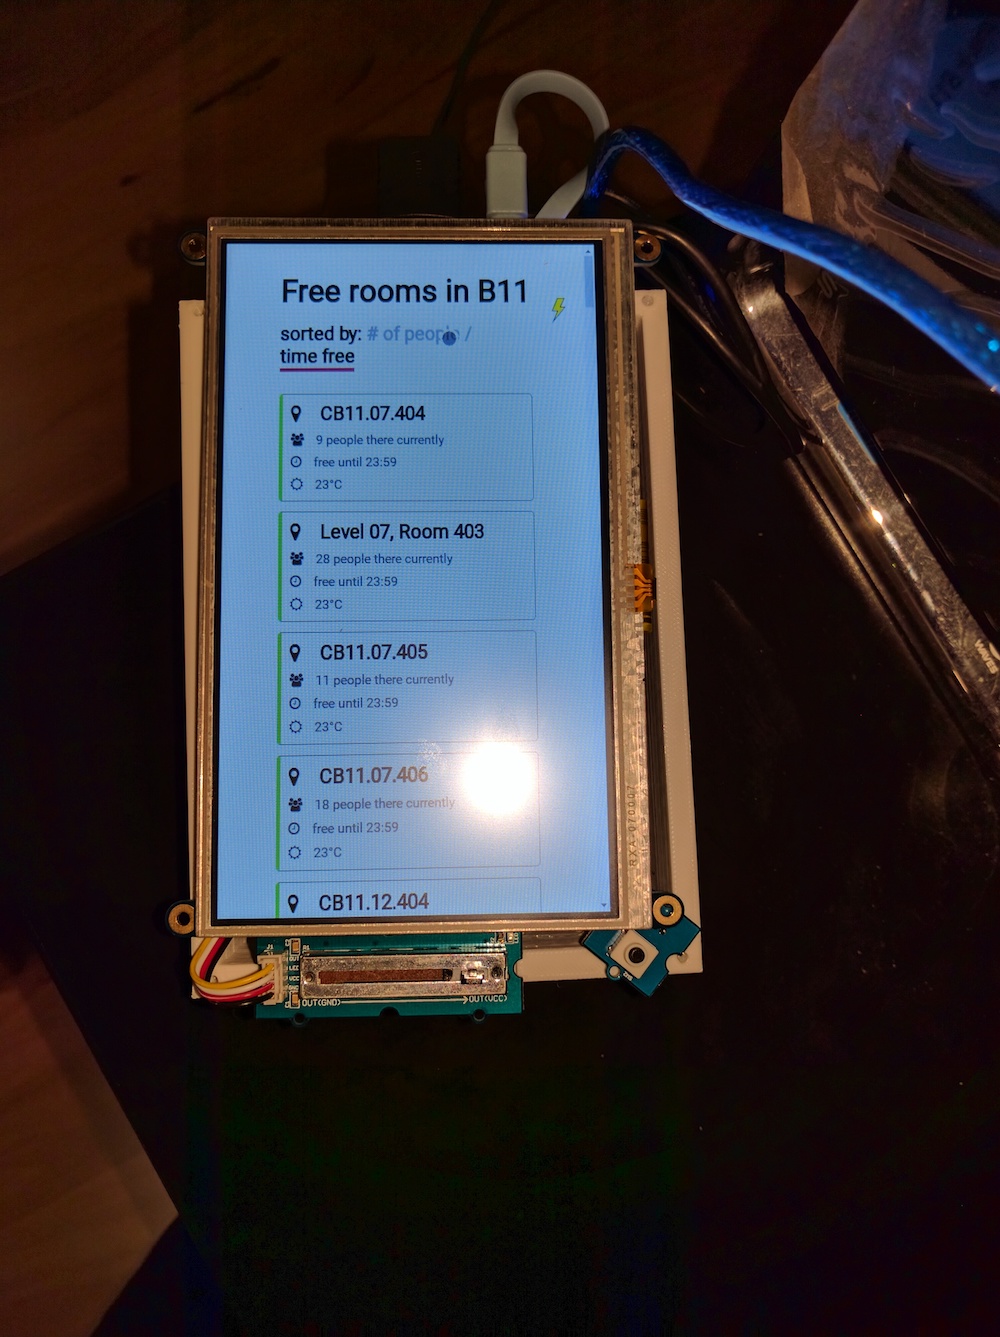
Our final product was, I have to say, rather impressive. It was fascinating to work in a highly competent, cross functional team. With two software developers, two user experience gurus and one hardware architect, we came out with a small box that solved the problem domain reasonably well, and with an intuitive and novel interface.
We performed two user studies, the first a realistic cardboard-based ‘paper’ prototype, and the second a rough implementation of the final design.
The hardware and overall product

We used an Arduino connected to the Raspberry Pi via a serial port, and a Grove base shield attached to the Arduino, which read from each sensor.
We targeted the Genuino 101, but it probably can be ported to most Arduino devices that can connect to Grove hardware.
We utilised the following hardware attached to the Arduino:
- Grove Base Shield
- Grove Sliding Potentiometer
- Grove Ultrasonic Ranger
- Grove Button
Sensor connections for each sensor to the respective port on the base shield:
- D7 - Grove Button
- A0 - Ultrasonic Ranger
- A1 - Sliding Potentiometer
Software bits
This is probably what most people will be interested in - it’s certainly the bit I had the most fun with.
Initially we were planning to develop entirely on the Arduino, until we realized that by including a Raspberry Pi in our stack, we’d be able to take advantage of higher-level languages than the C-like Processing language that powers Arduino.
Our second challenge was designing a touch-friendly user interface that could actually run on Linux. Python’s native tkinter UI library is anything but touch friendly, and I didn’t have much luck in understanding Kivy, which others have had success with. We then decided the best choice would be a Web-based platform, as the two software developers on our team specialise in Web development and native Javascript.
The eventual design has all of the sensor data being read and converted by the Arduino into a JSON object which is sent over a serial-to-USB port to the Raspberry Pi every 250 milliseconds.
The NodeJS server takes this data and maps it, retrieves all necessary room information and finally sends regular updates to our ReactJS web application via SocketIO.
The result of this stack, although it seems a little over-engineered for what is a basic kiosk, means that the user interface is truly universal, can be adapted to run on other devices, and, since ReactJS is just a glorified state machine, can be developed in isolation up without needing to be run on the actual embedded system. You can mock all sensor inputs and smooth the rough edges in your design, with an incredibly rapid feedback loop.
You can check out all the code running it on GitHub. There’s also more instructions on developing and running the system, in case you want to recreate it. The server and client code can be found under the rpi-runtime directory.
It’s worth noting that whilst it was an overall fairly easy experience, NodeJS is still not quite there on Raspbian and non-x86 devices. Some of the NodeJS libraries we used that had underlying C dependencies actually had to be compiled for the ARM chipset, so the npm dependencies took well over an hour to install.
I might do a future post on how to configure, calibrate and rotate the Grove LCD touchscreen we use later on. If you’re interested, let me know.
Design findings
The most rewarding and unique part of the subject was user research studies. A lot of what you learn in these studies is commonsense. Then again, most unit tests are also reiterating commonsense, but they’re still both incredibly important sanity checking steps in the development of a system.
One particularly noteworthy finding is how integral touch has become to the user experience. Users seem to automatically assume that if there is a large enough screen on a device, it is probably touch enabled. We found this really limits the amount of interactivity you can employ in the form of other sensors before users will consider the device non-intuitive or unnatural.
I believe this will continue to be an issue going forward, and is also pertinent in a post-iPhone world. Touch screens fail to provide effective contextual feedback to the user in the same way that a sliding potentiometer would, for example.
We also found that users eventually prefer physical instructions on how to utilize a kiosk system. We provided on-screen instructions on how to use the device when the screen wakes up. This was upon request by respondents of the initial paper prototype. However, during our second iteration we found that users would skip straight through the instructions as a reflex reaction. This leads to them being confused when they get to the actual interface and unable to use it correctly.
Prior work and references
- My name-shaker web app, which takes sensor data and uses it as an input for a ReactJS web app
- Previous guides on getting the NodeJS serial library working with NodeJS and the arduino
